Lesson 1: Introduction & Setup
Architecture at a Glance
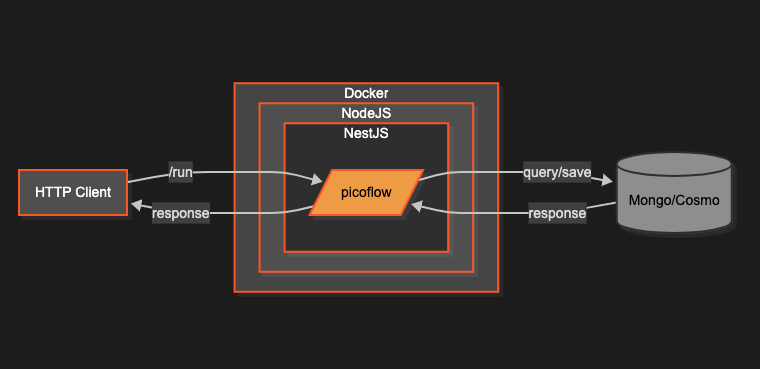
- Stateless NestJS/Node.js service in a Docker container.
- Session state persisted in MongoDB or Cosmos DB.
- A single
/runendpoint; the client only passesmessage,flowName, andCHAT_SESSION_ID.
Note
The entire BasicFlow tutorial rides on this simple deployment model. No Redis, no queues — just HTTP + a document DB.
Prerequisites
- Node.js v20+ (
nvm install v20). - Docker running locally (for MongoDB or Cosmos emulator).
- NestJS CLI:
npm i -g @nestjs/cli. - A Picoflow developer key from
dev@picoflow.io.
Environment File
Create .env in your Nest project:
PICOFLOW_KEY=<key>

OPENAI_KEY=<key>
GEMINI_KEY=<key>

LLM_RETRY=3
LLM_TEMPERATURE=0.2
SESSION_EXPIRATION=50000

DOCUMENT_DB=MONGO
MONGODB_URL=mongodb://localhost:27017/?directConnection=true
MONGODB_NAME=picoflow
MONGODB_COLLECTION=sessions
TIP
Swap DOCUMENT_DB=COSMO and the emulator variables if you prefer Cosmos DB.
Scaffold the Service
nest new my-flow
cd my-flow
npm i @picoflow/core
Add a minimal health controller so Kubernetes/LB probes stay happy:
@Controller('healthcheck')
export class HealthController {
  @Get()
  @HttpCode(HttpStatus.OK)
  check() {
    return { status: 'ok', timestamp: new Date().toISOString() };
  }
}
Wire Picoflow
Import FlowModule and register models in your AppModule:
@Module({
  imports: [FlowModule, ConfigModule],
  controllers: [TutorialController, HealthController],
})
export class AppModule {}
main.ts
- NodeJS and NestJS has a standard
main.tsfile that can be configured with a variety of options such as middlewares. - Nest is built such that it can use
ExpressorFastify(a successor) as its underlying HTTP engine. - I use
Fastifyhere because it is more modern with many improvements aboveExpress. - I also configure the
Swaggerfor auto API documentation.
import { NestFactory } from '@nestjs/core';
import { SwaggerModule, DocumentBuilder } from '@nestjs/swagger';
import { AppModule } from './app.module';
import {
  FastifyAdapter,
  NestFastifyApplication,
} from '@nestjs/platform-fastify';

async function bootstrap() {
  const app = await NestFactory.create<NestFastifyApplication>(
    AppModule,
    new FastifyAdapter(),
  );

  // Create Swagger document
  const config = new DocumentBuilder()
    .setTitle('Chat Flow API')
    .setDescription('API documentation for Chat Flow')
    .setVersion('1.0')
    .build();

  const document = SwaggerModule.createDocument(app, config);
  SwaggerModule.setup('api', app, document);

  await app.listen(8000, '0.0.0.0');
}
bootstrap();
npm dependencies
You may need the common JS packages below. After that you can do a yarn install or npm install
  "dependencies": {
    "@anatine/zod-nestjs": "^2.0.10",
    "@anatine/zod-openapi": "^2.2.7",
    "@fastify/static": "^7.0.4",
    "@nestjs/common": "^10.4.7",
    "@nestjs/config": "^4.0.1",
    "@nestjs/core": "^10.4.7",
    "@nestjs/jwt": "^10.2.0",
    "@nestjs/passport": "^10.0.3",
    "@nestjs/platform-fastify": "^10.4.7",
    "@nestjs/serve-static": "^4.0.2",
    "@nestjs/swagger": "^8.0.2",
    "@picoflow/core": "^1.0.7",
    "dotenv": "^16.4.5",
    "moment": "^2.30.1",
    "openapi3-ts": "^4.1.2",
    "passport": "^0.7.0",
    "reflect-metadata": "^0.2.0",
    "rxjs": "^7.8.1",
    "zod": "^3.24.2"
  }
Wrapping up
We’ve completed the routine setup. If you’re already familiar with NestJS, feel free to adjust the standard configuration as needed. Now we can shift our focus to the core code that demonstrates the key concepts and the advantages of using Picoflow.